iOSアプリで地図を組み込みたいときの選択肢は2つあります。
- Apple の MapKitを使用する
- Google Map SDKを使用する
GoogleMapのほうが使い慣れているユーザーが多いとは思いますが、AppleのMapアプリもどんどん使いやすくなってきてて、アプリに組み込むことも簡単です。
またiOSアプリに組み込むのであれば、標準で用意されているAppleのMapKitが手軽かと感じています。
今回は、AppleのMapKitをアプリに組み込む方法と、基本的な使い方をシェアします。
MapKitで地図を表示する
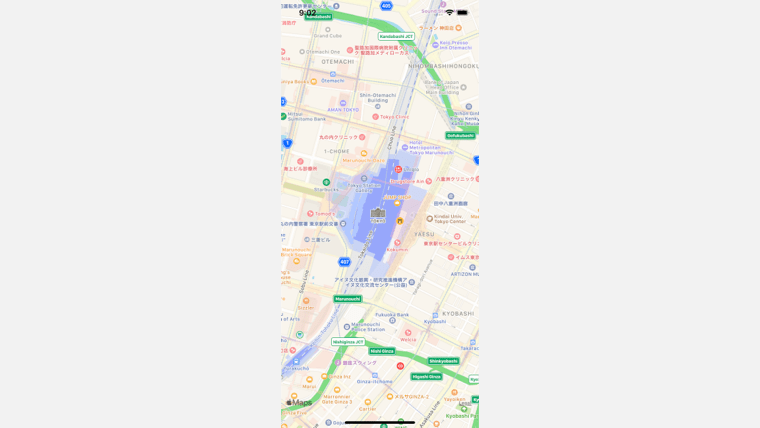
まずは、地図を表示させる方法です。AppleのMapKitの基本になります。
import MapKitでMapKitをインポートし、MKMapViewを配置、そして、いくつかのパラメータを設定するだけです。
地図を表示させるだけであれば、.setCenter()と.setRegion()で、地図の位置や縮尺を指定します。
以下サンプルです。storyboardは使わずに、コードのみで実装しています。
import UIKit
import MapKit

class ViewController: UIViewController {

    fileprivate lazy var mapView: MKMapView = {
        let map = MKMapView()
        map.translatesAutoresizingMaskIntoConstraints = false
        return map
    }()

    override func viewDidLoad() {
        super.viewDidLoad()

        view.addSubview(mapView)
        [mapView.topAnchor.constraint(equalTo: view.topAnchor),
         mapView.leadingAnchor.constraint(equalTo: view.leadingAnchor),
         mapView.trailingAnchor.constraint(equalTo: view.trailingAnchor),
         mapView.bottomAnchor.constraint(equalTo: view.bottomAnchor),]
            .forEach { $0.isActive = true }

        setupMap()
    }

    fileprivate func setupMap() {
        // map center
        let lat = CLLocationDegrees(35.6809591)
        let long = CLLocationDegrees(139.7673068)
        let loc: CLLocationCoordinate2D = CLLocationCoordinate2DMake(lat, long)
        mapView.setCenter(loc ,animated:true)

        // map region
        var region: MKCoordinateRegion = mapView.region
        region.center = loc
        region.span.latitudeDelta = 0.01
        region.span.longitudeDelta = 0.01
        mapView.setRegion(region,animated:true)
    }
}
MapKitでアノテーションを表示する
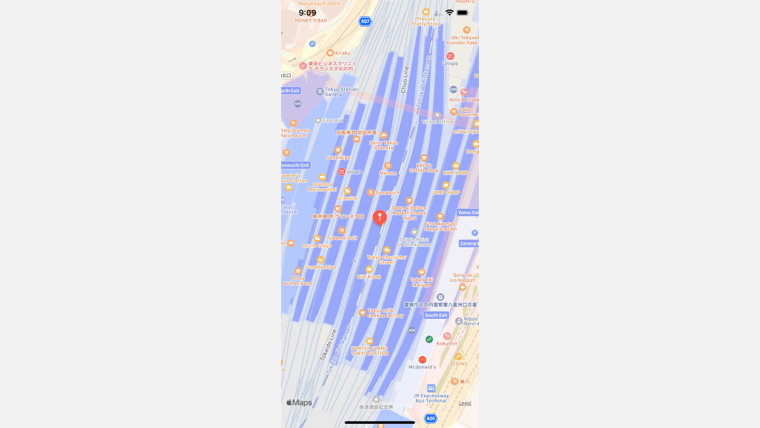
次は、表示した地図上にピンを立ててみます。このピンは、アノテーションと呼ばれており、このピンを表示するためには、MKPointAnnotationやMKAnnotation、MKAnnotationView、MKMarkerAnnotationViewなどが関係しています。
単純に、ピンを表示させるだけなら、mapViewにaddAnnotation・showAnnotationsを設定するだけです。
もちろんですが、各アノテーションには位置を指定します。この位置は上記サンプルの緯度経度をそのまま使いまわしているので、地図の中心にアノテーションが表示されます。
class ViewController: UIViewController {

    //省略
    fileprivate func setupMap() {
          //省略

        // anotation
        mapView.removeAnnotations(mapView.annotations)
        let annotation = MKPointAnnotation()
        annotation.coordinate = loc
        mapView.addAnnotation(annotation)
        mapView.showAnnotations(mapView.annotations, animated: true)
    }
}
MapKitでアノテーションの色を変更する
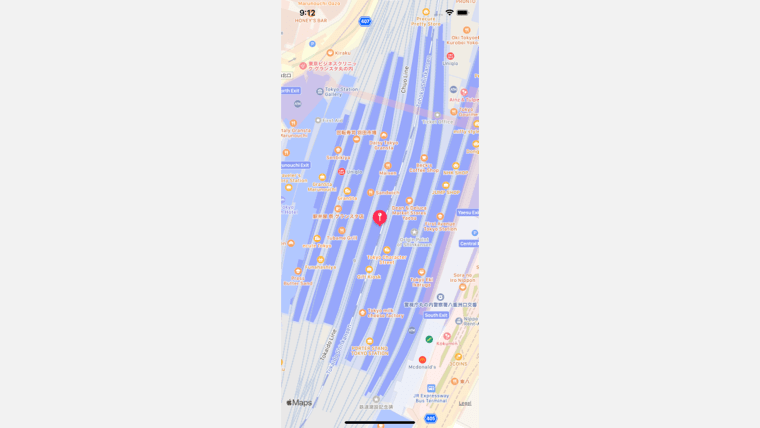
次は、表示されたアノテーションの色を変更してみます。
アノテーションは、UITableViewCellと似たようなreuseする仕組みになっているので、まずは、mapViewにdelegateを設定し、mapView viewFor annotationの中で色を変更する処理を記述します。
annotationView.markerTintColor = .systemPink
具体的には、このように、markerTintColorに、任意のUIColorを設定するだけでアノテーションの色を変更することが出来ます。
import UIKit
import MapKit

class ViewController: UIViewController {

    fileprivate lazy var mapView: MKMapView = {
        let map = MKMapView()
        map.delegate = self
        map.translatesAutoresizingMaskIntoConstraints = false
        return map
    }()

    override func viewDidLoad() {
        super.viewDidLoad()

        view.addSubview(mapView)
        [mapView.topAnchor.constraint(equalTo: view.topAnchor),
         mapView.leadingAnchor.constraint(equalTo: view.leadingAnchor),
         mapView.trailingAnchor.constraint(equalTo: view.trailingAnchor),
         mapView.bottomAnchor.constraint(equalTo: view.bottomAnchor),]
            .forEach { $0.isActive = true }

        setupMap()
    }

    fileprivate func setupMap() {
        // map center
        let lat = CLLocationDegrees(35.6809591)
        let long = CLLocationDegrees(139.7673068)
        let loc: CLLocationCoordinate2D = CLLocationCoordinate2DMake(lat, long)
        mapView.setCenter(loc, animated:true)

        // map region
        var region: MKCoordinateRegion = mapView.region
        region.center = loc
        region.span.latitudeDelta = 0.01
        region.span.longitudeDelta = 0.01
        mapView.setRegion(region, animated:true)

        // anotation
        mapView.removeAnnotations(mapView.annotations)
        let annotation = MKPointAnnotation()
        annotation.coordinate = loc
        mapView.addAnnotation(annotation)
        mapView.showAnnotations(mapView.annotations, animated: true)
    }
}

extension ViewController: MKMapViewDelegate {
    func mapView(_ mapView: MKMapView, viewFor annotation: MKAnnotation) -> MKAnnotationView? {
        let annotationView = MKMarkerAnnotationView(
            annotation: annotation,
            reuseIdentifier: nil
        )
        annotationView.markerTintColor = .systemPink
        return annotationView
    }
}
MapKitでアノテーションに任意の画像を設定する
もう少し掘り下げて見てみます。
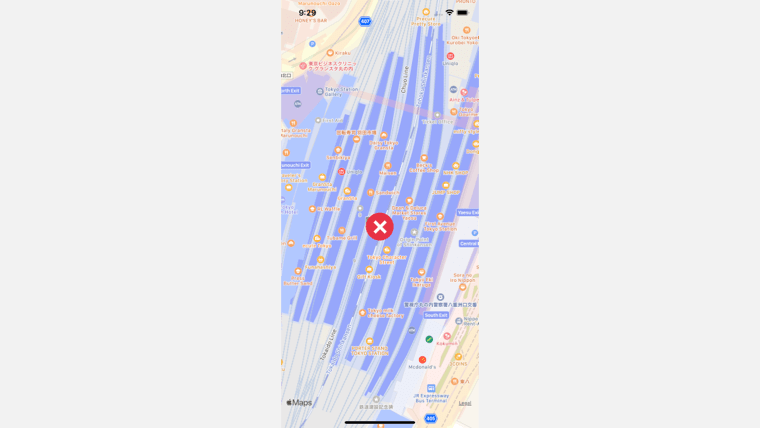
実際にアプリに組み込むときは、アノテーションに独自の画像を設定することが多いと思います。技術的な検証のみならまだしも、リリースするアプリではデザイナーさんが作成した画像をマップに表示する必要があったりします。
アノテーションに任意の画像を設定する方法も難しくありません。mapView viewFor annotationの中で取得出来るMKAnnotationView.imageにUIImageを設定します。
画像は何でもいいので、自分で用意してアプリに組み込んでおきます。
import UIKit
import MapKit

class ViewController: UIViewController {

    fileprivate lazy var mapView: MKMapView = {
        let map = MKMapView()
        map.delegate = self
        map.translatesAutoresizingMaskIntoConstraints = false
        return map
    }()

    override func viewDidLoad() {
        super.viewDidLoad()

        view.addSubview(mapView)
        [mapView.topAnchor.constraint(equalTo: view.topAnchor),
         mapView.leadingAnchor.constraint(equalTo: view.leadingAnchor),
         mapView.trailingAnchor.constraint(equalTo: view.trailingAnchor),
         mapView.bottomAnchor.constraint(equalTo: view.bottomAnchor),]
            .forEach { $0.isActive = true }

        setupMap()
    }

    fileprivate func setupMap() {
        // map center
        let lat = CLLocationDegrees(35.6809591)
        let long = CLLocationDegrees(139.7673068)
        let loc: CLLocationCoordinate2D = CLLocationCoordinate2DMake(lat, long)
        mapView.setCenter(loc, animated:true)

        // map region
        var region: MKCoordinateRegion = mapView.region
        region.center = loc
        region.span.latitudeDelta = 0.01
        region.span.longitudeDelta = 0.01
        mapView.setRegion(region, animated:true)

        // anotation
        mapView.removeAnnotations(mapView.annotations)
        let annotation = MKPointAnnotation()
        annotation.coordinate = loc
        mapView.addAnnotation(annotation)
        mapView.showAnnotations(mapView.annotations, animated: true)
    }
}

extension ViewController: MKMapViewDelegate {
    func mapView(_ mapView: MKMapView, viewFor annotation: MKAnnotation) -> MKAnnotationView? {
        let identifier = "annotation"
        if let annotationView = mapView.dequeueReusableAnnotationView(withIdentifier: identifier) {
            annotationView.annotation = annotation
            return annotationView
        } else {
            let annotationView = MKAnnotationView(
                annotation: annotation,
                reuseIdentifier: identifier
            )
            annotationView.image = UIImage(named: "annotation")
            return annotationView
        }
    }
}
以上、基本的な、AppleのMapKitの使い方です。また気が向いたらGoogle Map SDKも記事にするかもしれません。
ココナラというサービスをご存知ですか?
ココナラは、プログラミングやウェブ制作、デザインなどの専門知識を持つ人たちが、自分のスキルを活かしてサービスを提供する場所です。
初学者の方でも気軽に相談できるため、自分のスキルアップにも最適です。また、自分自身もココナラでサービスを提供することができ、収入を得ることができます。
ぜひ、ココナラに会員登録して、新しい世界を体験してみましょう!
