UINavigationControllerでのトランジションや、普通のpresentでのモーダル表示など、すこし飽きてきました。やっぱりかっこいいアニメーションが実装出来るといいですよね。
デフォルトで実装されている画面遷移のアニメーションをカスタマイズするには、UIViewControllerAnimatedTransitioningとUIViewControllerTransitioningDelegateを実装する必要があります。
カスタムトランジションの記事はあまり多くない印象で、実装も初めは混乱しやすいので、初級者を脱した中級者以降の技術じゃないかと思います。
ある程度iOSアプリ開発に慣れてきた人は、ぜひカスタムトランジションに挑戦してみてください。
サンプルアプリの概要
ということで、まずは今回作るアプリの概要です。
上記の動画を見て頂くと早いですが、UICollectionViewのセルをタップすると、詳細画面にZoomInしながらpresentします。dismissするときも元のセルの位置にZoomOutしながらアニメーションします。
サンプルアプリの構成要素
今回のアプリでは、カスタムトランジションアニメーションを実装することだけが目的なので、その他は極力シンプルにしています。実装するのは以下の4点です。
- 一覧表示画面:
ListViewController.swift - 一覧表示画面のセル:
CustomeCell.swift - 詳細表示画面:
DetailViewController.swift - カスタムトランジション:
CustomTransition.swift
カスタムトランジションを実装する前に、各画面を実装し普通のアニメーションで動くところまでを見ていきます。
ListViewController(一覧画面)
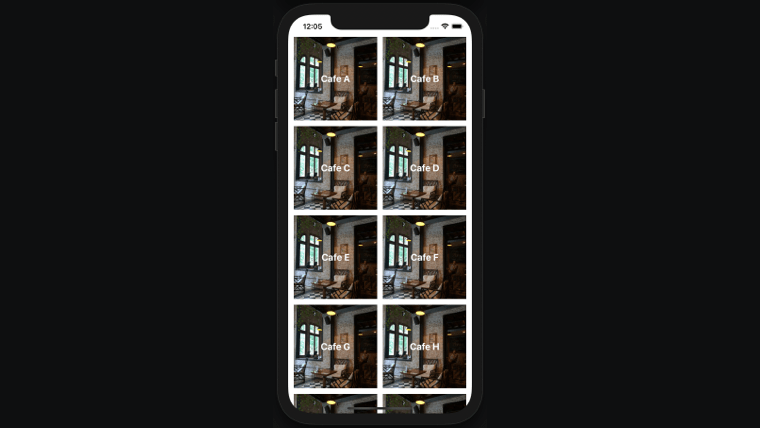
まずは一覧画面ですが、ここではUICollectionViewを使用して、セルを2列で表示しています。
UICollectionViewFlowLayoutの注意点
UICollectionViewをコードで実装する際に、各セルのサイズや隙間サイズ、セクションとの隙間などレイアウトを設定するには、UICollectionViewFlowLayoutが必要になります。ただし、このUICollectionViewFlowLayoutを設定するときは、UICollectionViewをイニシャライズする際に指定する必要があるので、UICollectionViewをイニシャライズする前に、let layout = UICollectionViewFlowLayout()としています。
各セルのサイズの指定ですが、今回は、左端の隙間: 12、セルとセルの隙間12、右端の隙間: 12としたかったので、(画面横全体の長さ - 隙間の合計) / セルの列数としています。
コードで書くとこのようになります。let size = (UIScreen.main.bounds.width - 36) / 2

CustomCellのRegister
次に、CustomeCellを使えるように、UICollectionViewにCustomeCellをregisterしていきます。色々試してみた結果、すべてコードで設定する以下の方法が最も簡単だなと感じています。
storyboardでも良いのですが、例えばnibの中にUICollectionViewを配置するとなぜかUICollectionViewCellが表示されなかったりして、結局部分的にコードで実装する羽目になる、というのを何度か経験しました。(自分が理解できていないだけかもしれない。。)あとstoryboad重い。レンダリングエラーもよく発生する。。
こういうことがあって、どんどんstoryboardが嫌いになっていきました。(余談)
UICollectionViewへのカスタムセルを登録します。view.register(CustomCell.self, forCellWithReuseIdentifier: CustomCell.idenifier)
UITableViewと全く同じです。
あとは、view.addSubviewして、AutoLayout設定して、UICollectionViewのdelegateとdataSourceしているだけです。
現時点でコードは以下のようになっています。
import UIKit
import SnapKit

class ListViewController: UIViewController {

    fileprivate let cafes: [String] = ["Cafe A", "Cafe B", "Cafe C", "Cafe D", "Cafe E", "Cafe F", "Cafe G", "Cafe H", "Cafe I", "Cafe J", "Cafe K", "Cafe L", ]

    lazy var collectionView: UICollectionView = {
        let layout = UICollectionViewFlowLayout()
        layout.scrollDirection = .vertical
        layout.minimumInteritemSpacing = 12
        layout.minimumLineSpacing = 12
        layout.sectionInset = UIEdgeInsets(top: 0, left: 12, bottom: 12, right: 12)
        let size = (UIScreen.main.bounds.width - 36)/2
        layout.itemSize = CGSize(width: size, height: size)

        let view = UICollectionView(frame: .zero, collectionViewLayout: layout)
        view.backgroundColor = .white
        view.register(CustomCell.self, forCellWithReuseIdentifier: CustomCell.idenifier)
        view.dataSource = self
        view.delegate = self
        return view
    }()

    override func viewDidLoad() {
        super.viewDidLoad()
        view.addSubview(collectionView)
    }

    override func viewWillLayoutSubviews() {
        super.viewWillLayoutSubviews()
        collectionView.snp.makeConstraints {
            $0.edges.equalToSuperview()
        }
    }
}

extension ViewController: UICollectionViewDelegate {
    func collectionView(_ collectionView: UICollectionView, didSelectItemAt indexPath: IndexPath) {
        let item = cafes[indexPath.item]
        let selectedCell = collectionView.cellForItem(at: indexPath) as! CustomCell
        let vc = DetailViewController(image: selectedCell.imageView.image!, name: item, indexPath: indexPath)
        present(vc, animated: true, completion: nil)
    }
}
extension ViewController: UICollectionViewDataSource {
    func collectionView(_ collectionView: UICollectionView, numberOfItemsInSection section: Int) -> Int {
        return cafes.count
    }

    func collectionView(_ collectionView: UICollectionView, cellForItemAt indexPath: IndexPath) -> UICollectionViewCell {
        let cell = collectionView.dequeueReusableCell(withReuseIdentifier: CustomCell.idenifier, for: indexPath) as! CustomCell
        cell.setLabel(title: cafes[indexPath.item])
        return cell
    }
}
CustomCell
カスタムセルを実装していきます。画像を表示させ、真ん中に一応文字を表示しているだけです。
色々githubを漁った結果、identifierですが、static変数を指定する方法がもっとお手軽だと思います。
static var idenifier: String {
        return String(describing: self)
}これで、CustomeCell.identifierでCustomeCellが出力されるようになります。UICollectionView.registerやdequeueReusableCellでこのidentifierを使いますが、上記のようにstatic変数に指定しておけば、コード補完されるので、typoが減ります。
あとは、UIImageViewとUILabelをインスタンス化し、contentViewにaddSubviewし、AutoLayoutを設定しているだけです。
独自セルにビューをaddする際の注意点
これも見落としがちな点なのですが、カスタムセルのレイアウトを組む時は、contentViewにaddSubviewするのがApple公式が推奨している方法です。CustomCellに直接addSubviewすることができてしまいますが、ハイライトした時やタップした時など、レイアウト・UIを操作する場合などで不都合が発生してきますので、必ずcontentViewにaddSubviewするようにします。storyboardやnibで作成しているとこのミスは発生しないと思います。
To configure the content and appearance of your cell, you can set its contentConfiguration and backgroundConfiguration . Alternatively, add the views needed to present the data item’s content as subviews to the view in the contentView property. Do not directly add subviews to the cell itself.
https://developer.apple.com/documentation/uikit/uicollectionviewcell
公式ドキュメントに、直接addするな!と書いてあります。
ちなみに、UITableViewCellの場合も全く同じです。
import UIKit

final class CustomCell: UICollectionViewCell {
    static var idenifier: String {
        return String(describing: self)
    }

    lazy var imageView: UIImageView = {
        let view = UIImageView()
        view.image = UIImage(named: "sample")!
        return view
    }()

    private lazy var titleLabel: UILabel = {
        let label = UILabel()
        label.textColor = .white
        label.textAlignment = .center
        label.font = .systemFont(ofSize: 20, weight: .bold)
        return label
    }()

    override init(frame: CGRect) {
        super.init(frame: frame)

        contentView.addSubview(imageView)
        imageView.addSubview(titleLabel)

        imageView.snp.makeConstraints {
            $0.edges.equalToSuperview()
        }
        titleLabel.snp.makeConstraints {
            $0.center.equalToSuperview()
        }
    }

    required init?(coder aDecoder: NSCoder) {
        fatalError("init(coder:) has not been implemented")
    }
}

extension CustomCell {
    func setLabel(title: String) {
        titleLabel.text = title
    }
}
DetailViewController
次に遷移後の詳細画面側を作成していきます。
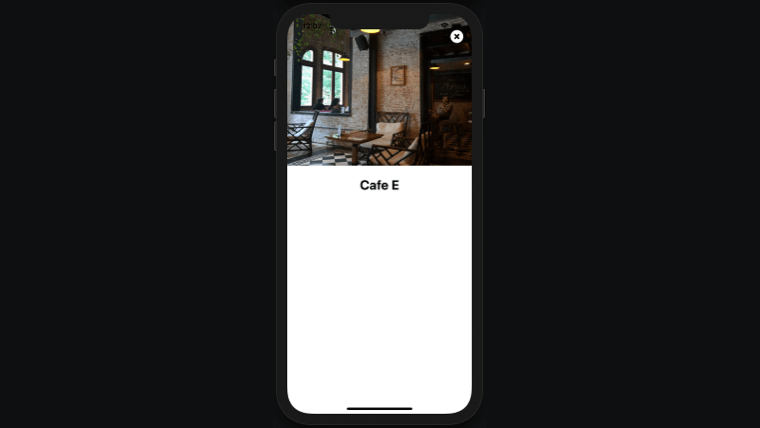
こちらもシンプルに、画面上部にUIImageView、その下にUILabel、画面右上にUIButton(dismissButton)を設置しているのみの実装です。
ポイントとしては、イニシャライズをカスタマイズして、トランジションに必要になるIndexPathを変数として持たせるようにしている箇所です。
let image: UIImage
let name: String
let indexPath: IndexPath
init(image: UIImage, name: String, indexPath: IndexPath) {
        self.image = image
        self.name = name
        self.indexPath = indexPath
        super.init(nibName: nil, bundle: nil)
}

required init?(coder: NSCoder) {
        fatalError("init(coder:) has not been implemented")
}その他は、各コンポネントをUIViewController.viewにaddSubview、AutoLayoutの設定、dismissButtonがタップされたときに、dismiss(animated: true, completion: nil)が呼ばれるようにアクションを設定しているぐらいです。
ここまでの実装が完了したら、通常のpresentでモーダル表示が動きます。
dismissButtonには、SFSybolsでアイコンを設定するようにしましたが、正直何でも良いです。普通に画像をAssets.scassetsに格納して、UIImage.setImage()で問題ありません。
import UIKit

final class DetailViewController: UIViewController {

    lazy var imageView: UIImageView = {
        let view = UIImageView()
        view.image = image
        return view
    }()

    lazy var titleLabel: UILabel = {
        let label = UILabel()
        label.font = .systemFont(ofSize: 28, weight: .bold)
        label.text = name
        return label
    }()

    lazy var dismissButton: UIButton = {
        let button = UIButton()
        let config = UIImage.SymbolConfiguration(pointSize: 20, weight: .black, scale: .large)
        let image = UIImage(systemName: "xmark.circle.fill", withConfiguration: config)!
        button.setImage(image, for: .normal)
        button.tintColor = .white
        button.addTarget(self, action: #selector(dismissButtonTapped(_:)), for: .touchUpInside)
        return button
    }()

    let image: UIImage
    let name: String
    let indexPath: IndexPath
    init(image: UIImage, name: String, indexPath: IndexPath) {
        self.image = image
        self.name = name
        self.indexPath = indexPath
        super.init(nibName: nil, bundle: nil)
    }

    required init?(coder: NSCoder) {
        fatalError("init(coder:) has not been implemented")
    }

    override func viewDidLoad() {
        super.viewDidLoad()
        view.backgroundColor = .white
        view.addSubview(imageView)
        view.addSubview(titleLabel)
        view.addSubview(dismissButton)
    }

    override func viewWillLayoutSubviews() {
        super.viewWillLayoutSubviews()

        imageView.snp.makeConstraints {
            $0.top.leading.trailing.equalToSuperview()
            $0.height.equalTo(320)
        }
        titleLabel.snp.makeConstraints {
            $0.top.equalTo(imageView.snp.bottom).offset(24)
            $0.centerX.equalToSuperview()
        }
        dismissButton.snp.makeConstraints {
            $0.top.equalToSuperview().offset(32)
            $0.trailing.equalToSuperview().offset(-16)
        }
    }
}

extension DetailViewController {
    @objc func dismissButtonTapped(_ sender: UIButton) {
        dismiss(animated: true, completion: nil)
    }
}
ここからが、カスタムトランジションのアニメーションの実装になります。
CustomTransition
トランジションアニメーションをカスタマイズするには、UIViewControllerAnimatedTransitioningとUIViewControllerTransitioningDelegateという2つのprotocolに準拠した、NSObjectを継承したクラスを実装する必要があります。
今回は、CustomTransitionという名前の独自クラスを作成しました。
class CustomTransition: NSObject {}
extension CustomTransition: UIViewControllerAnimatedTransitioning {}
extension CustomTransition: UIViewControllerTransitioningDelegate {}そして、このCustomTransitionをpresentするUIViewControllerのtransitionDelegateに設定します。
let transitionManager = CustomTransition()

func collectionView(_ collectionView: UICollectionView, didSelectItemAt indexPath: IndexPath) {
        let item = cafes[indexPath.item]
        let selectedCell = collectionView.cellForItem(at: indexPath) as! CustomCell
        let vc = DetailViewController(image: selectedCell.imageView.image!, name: item, indexPath: indexPath)
        vc.modalPresentationStyle = .fullScreen // 追加
        vc.transitioningDelegate = transitionManager // 追加
        present(vc, animated: true, completion: nil)
}次は、CustomTransitionの実装の大枠を見ていきます。
import UIKit

enum TransitionType {
    case presentation
    case dismissal
}

class CustomTransition: NSObject {
    let transitionDuration: Double = 0.2
    var transition: TransitionType = .presentation
}

extension CustomTransition: UIViewControllerAnimatedTransitioning {
    func transitionDuration(using transitionContext: UIViewControllerContextTransitioning?) -> TimeInterval {
        return transitionDuration
    }

    func animateTransition(using transitionContext: UIViewControllerContextTransitioning) {
        switch transition {
        case .presentation:
            presentTransition(using: transitionContext)
        case .dismissal:
            dismissalTransition(using: transitionContext)
        }
    }

    private func presentTransition(using transitionContext: UIViewControllerContextTransitioning) {
        // present animation
    }

    private func dismissalTransition(using transitionContext: UIViewControllerContextTransitioning) {
        // dismiss animation
    }
}

extension CustomTransition: UIViewControllerTransitioningDelegate {
    func animationController(forPresented presented: UIViewController, presenting: UIViewController, source: UIViewController) -> UIViewControllerAnimatedTransitioning? {
        transition = .presentation
        return self
    }

    func animationController(forDismissed dismissed: UIViewController) -> UIViewControllerAnimatedTransitioning? {
        transition = .dismissal
        return self
    }
}
TransitionType enumの実装
まずは、transitionがpresentなのかdismissなのかを判別するenumを定義します。今回のアニメーション程度のシンプルさなら、isPresenting: Boolでも良いかもしれません。
enum TransitionType {
    case presentation
    case dismissal
}
CustomTransitionの変数
今回は、CustomTransitionにtransitionDuration: Doubleとtransition: TransitionTypeの2つの変数を設定しました。
transitionDurationにアニメーション時間を指定しておくことで、presentするときも、dismissするときも同じ長さのアニメーションになるようにしています。
presentの時とdismissのときとで、アニメーション時間を変更したい場合は、presentationDuration、dismissalDurationとそれぞれ別に設定しても良いですね。
// 参考
func transitionDuration(using transitionContext: UIViewControllerContextTransitioning?) -> TimeInterval {
        switch transition {
        case .presentaiton:
            return presentationDuration
        case .dismissal:
            return dismissalDuration
}
UIViewControllerTransitioningDelegate
presentされるとき及びdismissされるときは、UIViewControllerTransitioningDelegate内の関数が呼ばれます。
extension CustomTransition: UIViewControllerTransitioningDelegate {
    func animationController(forPresented presented: UIViewController, presenting: UIViewController, source: UIViewController) -> UIViewControllerAnimatedTransitioning? {
        transition = .presentation
        return self
    }

    func animationController(forDismissed dismissed: UIViewController) -> UIViewControllerAnimatedTransitioning? {
        transition = .dismissal
        return self
    }
}ここで、transition変数を、それぞれ.presentation / .dismissalを設定して、selfをreturnするようにしています。
UIViewControllerAnimatedTransitioning
アニメーションを実装するのは、UIViewControllerAnimatedTransitioningになります。
// animation時間
func transitionDuration(using transitionContext: UIViewControllerContextTransitioning?) -> TimeInterval {
        return transitionDuration
}

// 実際のアニメーションを実装する部分
func animateTransition(using transitionContext: UIViewControllerContextTransitioning) {
        switch transition {
        case .presentation:
            presentTransition(using: transitionContext)
        case .dismissal:
            dismissalTransition(using: transitionContext)
        }
}今回は、animateTransitionでtransitonによって、それぞれ別の関数を定義し、presetTransition / dismissalTransitionを呼ぶようにしています。
ここでそれぞれのアニメーションを具体的に実装していきます。
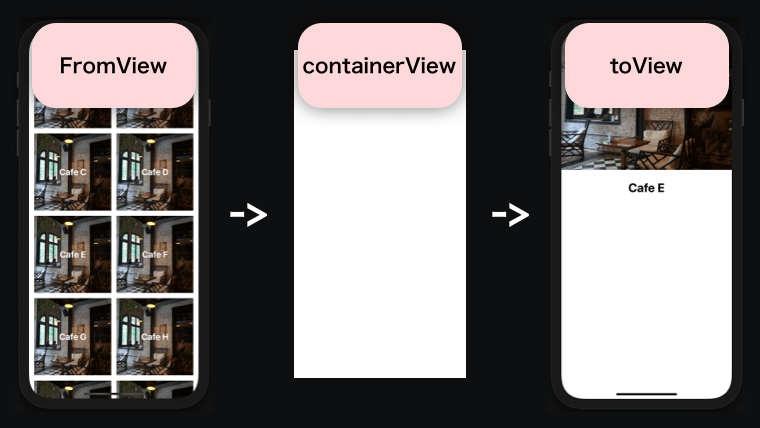
トランジションアニメーションの構成要素には、遷移元のView・遷移後のView・アニメーションを実行するViewと3つの登場人物がいます。
遷移元は、transitionContext.viewController(forKey: .from)
遷移後は、transitionContext.viewController(forKey: .to)
アニメーションを実行するViewは、transitionContext.containerView
で取得します。
そして必要な要素をtransitionContext.containerViewに配置して、UIView.animateする流れです。
まずはタップしたセルを特定し、その位置にanimationViewとしてUIImageViewを作成します。
次に、遷移後のUIとして、transitionContext.viewController(forKey: .to) as! DetailViewControllerの取得、遷移後のframeの設定、一旦透明化、など処理を施していきます。このとき、遷移後のDetailViewCOntrollerのUIImageViewは完全に非表示(isHidden = true)しておきます。
animationViewとtoVcの準備が整ったので、containerViewにaddSubviewしていきます。
そして最後に、animationViewをtoVcの位置にUIView.animateしていきます。
animationが完了したら、toVcのUIImageViewの非表示を解除、animationViewをremoveFromSuperview()で取り除き、アニメーションの終了連絡をtransitionContext.completeTransition(true)で発火します。
大まかな流れは以上です。遷移前のUI、遷移後のUIのframe特定し、それらをアニメーションさせるViewを実装する、アニメーションが完了したらアニメーション用のviewを取り除く、という流れです。
複雑なUIをアニメーションさせる場合は、UIImageViewでは物足りず独自クラスのUIを実装することになるかと思います。その際も考え方は変わりませんが、独自クラスのUIをサクッとイニシャライズ出来るようにする工夫が必要になってくると思います。
dismissのときは、上記の反対の処理を行うだけです。注意点としては、transitionContext.viewController(forKey: .from)とtransitionContext.viewController(forKey: .to)が逆になるので、どの画面からどの画面にアニメーションするのかというのを意識して進めていく必要があります。
CustomTransitionクラスのコード全体です。
import UIKit

enum TransitionType {
    case presentation
    case dismissal
}

class CustomTransition: NSObject {
    let transitionDuration: Double = 0.2
    var transition: TransitionType = .presentation
}

extension CustomTransition: UIViewControllerAnimatedTransitioning {
    func transitionDuration(using transitionContext: UIViewControllerContextTransitioning?) -> TimeInterval {
        return transitionDuration
    }

    func animateTransition(using transitionContext: UIViewControllerContextTransitioning) {
        switch transition {
        case .presentation:
            presentTransition(using: transitionContext)
        case .dismissal:
            dismissalTransition(using: transitionContext)
        }
    }

    private func presentTransition(using transitionContext: UIViewControllerContextTransitioning) {
        let fromVc = transitionContext.viewController(forKey: .from) as! ViewController
        let toVc = transitionContext.viewController(forKey: .to) as! DetailViewController
        let containerView = transitionContext.containerView

        let cell = fromVc.collectionView.cellForItem(at: (fromVc.collectionView.indexPathsForSelectedItems?.first)!) as! CustomCell
        let animationView = UIImageView(image: cell.imageView.image)
        animationView.frame = containerView.convert(cell.imageView.frame, from: cell.imageView.superview)
        cell.imageView.isHidden = true

        toVc.view.frame = transitionContext.finalFrame(for: toVc)
        toVc.view.alpha = 0
        toVc.view.layoutIfNeeded()
        toVc.imageView.isHidden = true

        containerView.addSubview(toVc.view)
        containerView.addSubview(animationView)

        UIView.animate(withDuration: transitionDuration(using: transitionContext), delay: 0, options: .curveEaseInOut, animations: {
            toVc.view.alpha = 1
            animationView.frame = containerView.convert(toVc.imageView.frame, from: toVc.view)
        }, completion: { _ in
            toVc.imageView.isHidden = false
            cell.imageView.isHidden = false
            animationView.removeFromSuperview()
            transitionContext.completeTransition(true)
        })
    }

    private func dismissalTransition(using transitionContext: UIViewControllerContextTransitioning) {
        let fromVc = transitionContext.viewController(forKey: .from) as! DetailViewController
        let toVc = transitionContext.viewController(forKey: .to) as! ViewController
        let containerView = transitionContext.containerView

        let animationView = fromVc.imageView.snapshotView(afterScreenUpdates: false)
        animationView?.frame = containerView.convert(fromVc.imageView.frame, from: fromVc.imageView.superview)
        fromVc.imageView.isHidden = true

        let cell = toVc.collectionView.cellForItem(at: fromVc.indexPath) as! CustomCell
        cell.imageView.isHidden = true
        toVc.view.frame = transitionContext.finalFrame(for: toVc)

        containerView.insertSubview(toVc.view, belowSubview: fromVc.view)
        containerView.addSubview(animationView!)

        UIView.animate(withDuration: transitionDuration(using: transitionContext), delay: 0, options: .curveEaseInOut, animations: {
            fromVc.view.alpha = 0
            animationView?.frame = containerView.convert(cell.imageView.frame, from: cell.imageView.superview)
        }, completion: { _ in
            animationView?.removeFromSuperview()
            fromVc.imageView.isHidden = false
            cell.imageView.isHidden = false
            transitionContext.completeTransition(true)
        })
    }
}


extension CustomTransition: UIViewControllerTransitioningDelegate {
    func animationController(forPresented presented: UIViewController, presenting: UIViewController, source: UIViewController) -> UIViewControllerAnimatedTransitioning? {
        transition = .presentation
        return self
    }

    func animationController(forDismissed dismissed: UIViewController) -> UIViewControllerAnimatedTransitioning? {
        transition = .dismissal
        return self
    }
}
これからもいろいろなカスタムトランジションアニメーションを実装して、より知識経験を深めていきます。

![]()
ココナラというサービスをご存知ですか?
ココナラは、プログラミングやウェブ制作、デザインなどの専門知識を持つ人たちが、自分のスキルを活かしてサービスを提供する場所です。
初学者の方でも気軽に相談できるため、自分のスキルアップにも最適です。また、自分自身もココナラでサービスを提供することができ、収入を得ることができます。
ぜひ、ココナラに会員登録して、新しい世界を体験してみましょう!