プログラミング学習において、初学者がつまずいてやる気を失くしてしまうのが環境構築です。
Dockerは設定ファイルを共有することで、どのPCでも同一の環境を簡単に構築することのできるツールです。
今回は、プログラミング初学者に向けて、ローカル環境でDockerを用いてRuby on Railsのアプリを開発する手順を記載します。
以下の2台のサーバーを立てることを想定して環境を構築していきます。
- WEBサーバー
- DBサーバー
※Macを使用しています。
フォルダを作成
Document配下に“docker_rails_aws_sample”フォルダを作成します。
フォルダ名は良きように変更してください。
Docker関連のファイルの準備
作成したフォルダ直下に以下の2つのファイルを作成します。
- Dockerfile
- docker-compose.yml
Dockerfile
FROM ruby:2.7.1

RUN curl -sS https://dl.yarnpkg.com/debian/pubkey.gpg | apt-key add - \
  && echo "deb https://dl.yarnpkg.com/debian/ stable main" | tee /etc/apt/sources.list.d/yarn.list
RUN apt-get update -qq && apt-get install -y nodejs postgresql-client yarn
RUN apt-get update && apt-get install -y cron

RUN mkdir /var/app
RUN mkdir /var/app/current
ENV APP_ROOT /var/app/current

WORKDIR $APP_ROOT

COPY Gemfile $APP_ROOT/Gemfile
COPY Gemfile.lock $APP_ROOT/Gemfile.lock

RUN gem uninstall bundler
RUN gem install bundler:2.1.4
RUN bundle install --jobs=4

EXPOSE 80
COPY . $APP_ROOT
CMD ["rails", "s", "-b", "0.0.0.0", "-p", "80"]
docker-compose.yml
version: '3'
services:
  web:
    build:
      context: .
      dockerfile: Dockerfile
    command: /bin/sh -c 'rm -f /var/app/current/tmp/pids/server.pid && bundle exec rails s -p 80 -b '0.0.0.0''
    tty: true
    stdin_open: true
    environment:
      - RAILS_DB_HOST=db
      - RAILS_DB_PASSWORD=postgres
      - RAILS_DB_USERNAME=postgres
      - RAILS_ENV=development
      - RAILS_SERVE_STATIC_FILES=1
      - RAILS_MAX_THREADS=2
      - SECRET_KEY_BASE=hogehoge
      - WEB_CONCURRENCY=1
      - MAILER_URL=localhost:8080
      - ENVIRONMENT=LOCAL
    volumes:
      - .:/var/app/current
      - bundle:/usr/local/bundle
      - ./log:/var/log
    ports:
      - '8080:80'
    depends_on:
      - db
  db:
    image: postgres:10.1
    ports:
      - '8432:5432'
    environment:
      - POSTGRES_USER=postgres
      - POSTGRES_PASSWORD=postgres
    volumes:
      - postgres:/var/lib/postgresql/data
volumes:
  bundle:
  postgres:
    driver: local
Gemfile関連のファイルの準備
docker環境にrailsをインストールするために、作成したフォルダ直下に以下の2つのファイルを作成します。
- Gemfile
- Gemfile.lock
Gemfile
source 'https://rubygems.org'
git_source(:github) { |repo| "https://github.com/#{repo}.git" }

ruby '2.7.1'

# Bundle edge Rails instead: gem 'rails', github: 'rails/rails'
gem 'rails', '~> 6.0.3', '>= 6.0.3.4'
# Use postgresql as the database for Active Record
gem 'pg', '>= 0.18', '< 2.0'
# Use Puma as the app server
gem 'puma', '~> 4.1'
# Use SCSS for stylesheets
gem 'sass-rails', '>= 6'
# Transpile app-like JavaScript. Read more: https://github.com/rails/webpacker
gem 'webpacker', '~> 4.0'
# Turbolinks makes navigating your web application faster. Read more: https://github.com/turbolinks/turbolinks
gem 'turbolinks', '~> 5'
# Build JSON APIs with ease. Read more: https://github.com/rails/jbuilder
gem 'jbuilder', '~> 2.7'
# Use Redis adapter to run Action Cable in production
# gem 'redis', '~> 4.0'
# Use Active Model has_secure_password
# gem 'bcrypt', '~> 3.1.7'

# Use Active Storage variant
# gem 'image_processing', '~> 1.2'

# Reduces boot times through caching; required in config/boot.rb
gem 'bootsnap', '>= 1.4.2', require: false

group :development, :test do
  # Call 'byebug' anywhere in the code to stop execution and get a debugger console
  gem 'byebug', platforms: [:mri, :mingw, :x64_mingw]
end

group :development do
  # Access an interactive console on exception pages or by calling 'console' anywhere in the code.
  gem 'web-console', '>= 3.3.0'
  gem 'listen', '~> 3.2'
  # Spring speeds up development by keeping your application running in the background. Read more: https://github.com/rails/spring
  gem 'spring'
  gem 'spring-watcher-listen', '~> 2.0.0'
end

group :test do
  # Adds support for Capybara system testing and selenium driver
  gem 'capybara', '>= 2.15'
  gem 'selenium-webdriver'
  # Easy installation and use of web drivers to run system tests with browsers
  gem 'webdrivers'
end

# Windows does not include zoneinfo files, so bundle the tzinfo-data gem
gem 'tzinfo-data', platforms: [:mingw, :mswin, :x64_mingw, :jruby]
Gemfile.lock
このファイルは空のままでOKです。作成しないと、docker環境構築中にエラーが出ます。
Docker環境構築コマンドを実行
ターミナルを立ち上げ、先程作成したフォルダに移動し、以下のコマンドを実行します。
$ docker-compose buildしばらくして以下が表示されれば完了です。
Successfully built XXXXXXXXXXXX
Successfully tagged docker_rails_aws_sample_web:latest
これでdockerを使用する環境が整いました。
railsコマンドでアプリを作成
構築したdocker環境上で、railsアプリを立ち上げていきます。
$ docker-compose run --rm web rails new . -d postgresqldocker上でコマンドを実行するには、”docker-compose run”を使用します。”–rm web“は、webサーバーでコマンドを実行し、実行完了後にサーバーの起動を停止させるという意味です。
“.”によって、カレントディレクトリにrailsファイルを展開することが出来ます。指定しないと、フォルダ内にフォルダが作成され、その中にrails関連ファイルが展開されることになります。
そして、“-d postgresql”でデータベースをPostgreSQLに指定します。
これでrails関連ファイルが展開されます。数分はかかりますので今のうちに、Docker Desktop for Macをインストールしておきましょう。
Docker Desktop for Macをインストール
立ち上げているdockerの状況を確認するには、mac用に開発されている、”Docker Desktop for Mac”をインストールします。
URL: https://hub.docker.com/editions/community/docker-ce-desktop-mac/
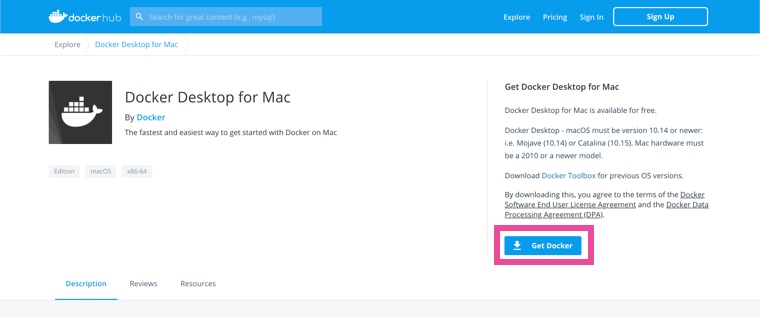
ダウンロード・インストール後に、起動させてみます。
macのツールバー上にdockerアイコンが表示されていればOKです。アイコンをクリックし、「Dashboard」を選択します。
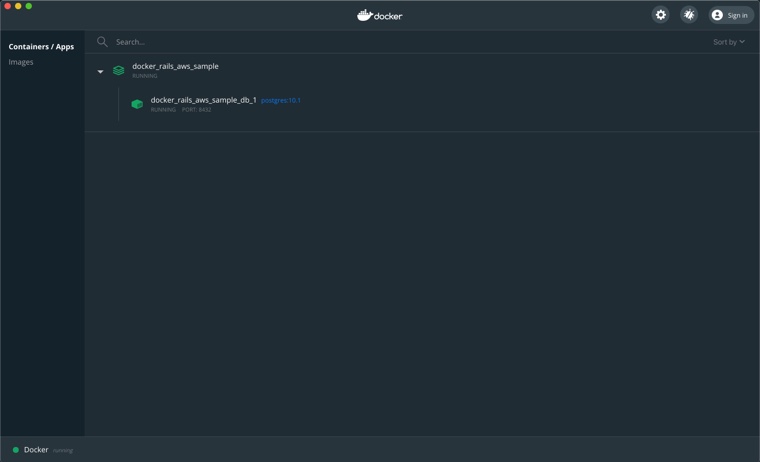
DBサーバーが立ち上がっており、WEBサーバーは立ち上がっていないことが確認出来ますので、WEBサーバーも立ち上げます。
Dockerを立ち上げる
dockerを立ち上げるには、以下のコマンドを実行します。
$ docker-compose up -dもしくは
$ docker-compose updocker_rails_aws_sample_db_1 is up-to-date
Creating docker_rails_aws_sample_web_1 … doneこのように表示されれば、正常に立ち上がっています。
Docker Desktop for Macでも確認してみましょう。

表示が緑であれば、正常に立ち上がっています。
この状態で一度、localhost:8080にアクセスしてみましょう。
ブラウザのURL欄に、”localhost:8080″と打ち込むか、以下をクリックして開くことが出来ます。
http://localhost:8080/
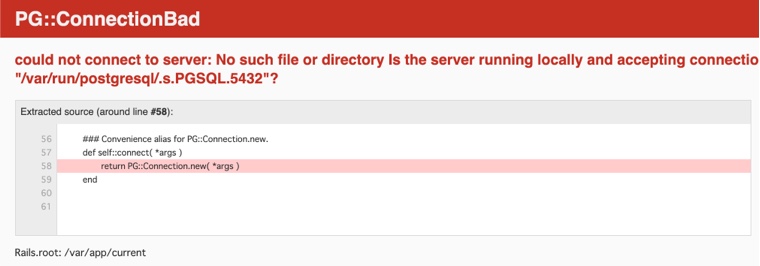
エラーが出ますが、大丈夫です。このエラーはデータベースを作成していないのでデータベースと接続出来ないとのことです。
データベースを作成する
railsで使用するデータベースを設定するには、”config/database.yml”を修正する必要があります。
config/database.yml(抜粋)
# PostgreSQL. Versions 9.3 and up are supported.

default: &default
  adapter: postgresql
  encoding: unicode
  # For details on connection pooling, see Rails configuration guide
  # https://guides.rubyonrails.org/configuring.html#database-pooling
  pool: <%= ENV.fetch("RAILS_MAX_THREADS") { 5 } %>
  host: <%= ENV.fetch("RAILS_DB_HOST") { "" } %>
  username: <%= ENV.fetch("RAILS_DB_USERNAME") { "" } %>
  password: <%= ENV.fetch("RAILS_DB_PASSWORD") { "" } %>

development:
  <<: *default
  database: development

test:
  <<: *default
  database: test

production:
  <<: *default
  database: production
重要箇所のみ抜粋していますが、デフォルトとして、環境変数を用いて、host, username, passwordを指定します。
また各環境のdatabaseの名前をシンプルに修正しました。
version: '3'
services:
  web:
    build:
      context: .
      dockerfile: Dockerfile
    command: /bin/sh -c 'rm -f /var/app/current/tmp/pids/server.pid && bundle exec rails s -p 80 -b '0.0.0.0''
    ...
    ...
    environment: <- このenviroment以下にしているしている文字列がdocker上で使用できる環境変数です。
      - RAILS_DB_HOST=db
      - RAILS_DB_PASSWORD=postgres
      - RAILS_DB_USERNAME=postgres
      - RAILS_ENV=development
`rails new .` で展開されたファイルと違いを見比べて見てください。
この状態で、次のコマンドを実行します。
$ docker-compose run —-rm web rails db:create以下のように表示されればデータベースの作成は完了です。
Creating docker_rails_aws_sample_web_run … done
Created database ‘development’
Created database ‘test’再度、localhost:8080にアクセスしてみましょう。(http://localhost:8080/)
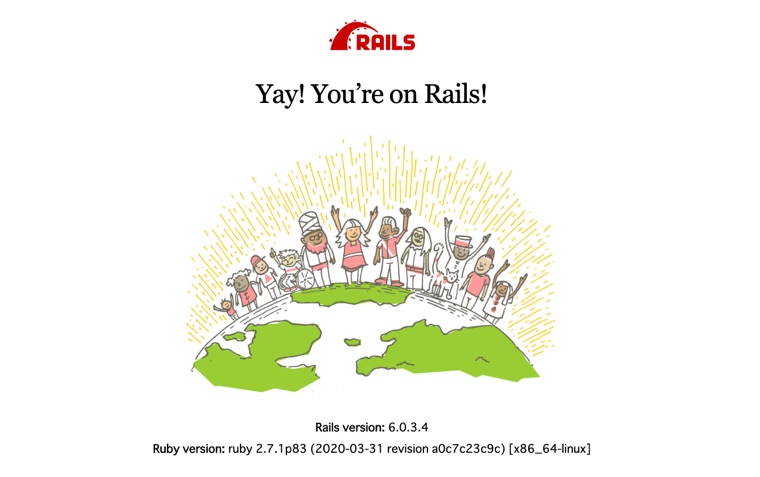
このような画面が表示されたら、環境構築は完了です。
トップページを編集してみる
環境構築が完了したので、後はお好きなように開発を進めてください。
例として、トップページのみ少しいじってみて、変更が反映されることを確認してみます。
routes.rb
# config/routes.rb

Rails.application.routes.draw do
  root to: 'top_pages#index'
end
ルートのパスをtop_pagesに変更してみます。
controllers
# app/controllers/top_pages_controller.rb

class TopPagesController < ActionController::Base
  def index
    puts 'top_pages_controller index'
  end
end
controllers配下に、top_pages_controller.rbを作成します。
views
# views/top_pages/index.html.erb

<h2>Top Page Controller Index</h2>
最低限のviewファイルを用意します。
Top Page Controller Indexの文字が表示されていれば正常に動いています。
Docker参考
修正が反映されない時、環境変数が反映されない時などは、dockerを再起動させてみてください。
例えば、docker-compose.ymlファイルの修正などは、dockerを立ち上げ直さないと反映されません。
最低限、以下を覚えていれば大丈夫です。
dockerを停止する
$ docker-compose downdockerを起動する
$ docker-compose up -d以上です。